视频录制流程
前面讲解录制音频时讲过,FFmpeg对各大平台的输入和输出API进行了统一的封装,这里就不在阐述。
视频的录制相比音频的录制流程基本差不多,主要是去掉了FIFO队列的逻辑。另外对于视频帧来说,FFmpeg提供的SwsContext API处理较慢,一般不太使用,可以用libyuv库,或者使用OpenGL API用GPU来提速。
打开视频输入
注册视频设备
所有的输入和输出设备默认都是没有注册的,如果需要使用,需要手动调用下面的注册函数。
1
| avdevice_register_all();
|
创建输入上下文
FFmpeg将对视频文件的解封装和封装等操作都抽象到AVFormatContext中,所以视频文件的打开和输出都是要通道AVFormatContext来完成。
1
2
3
4
5
6
7
8
9
10
11
12
13
14
|
AVInputFormat* format = av_find_input_format("avfoundation");
AVDictionary* options = nullptr;
av_dict_set(&options, "video_size", "1280x720", 0);
av_dict_set(&options, "framerate", "30", 0);
av_dict_set(&options, "pixel_format", "nv12", 0);
if ((error = avformat_open_input(&fmt_ctx_in_, "0", format, &options)) < 0) {
std::cout << "Could not open input device " << av_err2str(error)
<< std::endl;
fmt_ctx_in_ = nullptr;
return error;
}
|
获取设备输入数据格式
FFmpeg将视频文件中的每一个轨道都封装成了AVStream对象,一个正常的媒体文件一般都包含两个Stream,一个音频流和一个视频流。
对于这里,视频设备只有一个输入流,AVStream中包含了输入视频数据的分辨率、帧率、像素格式等视频相关信息
1
2
|
stream_in_ = fmt_ctx_in_->streams[0];
|
创建解码上下文
FFmpeg将对视频文件的编码和解码等操作都抽象到AVCodecContext中,所以视频文件的编码和解码都是要通过AVCodecContext来完成。
1
2
3
4
5
6
7
8
9
10
11
12
13
14
15
16
17
18
19
20
21
22
23
24
25
|
codec = avcodec_find_decoder(stream_in_->codecpar->codec_id);
if (!codec) {
std::cout << "Could not find input codec" << std::endl;
return AVERROR_EXIT;
}
codec_ctx_in_ = avcodec_alloc_context3(codec);
if (!codec_ctx_in_) {
std::cout << "Could not allocate input codec context" << std::endl;
return AVERROR(ENOMEM);
}
if ((error = avcodec_parameters_to_context(codec_ctx_in_,
stream_in_->codecpar)) < 0) {
std::cout << "Could not copy parameters to input codec" << av_err2str(error)
<< std::endl;
return error;
}
if ((error = avcodec_open2(codec_ctx_in_, codec, nullptr)) < 0) {
std::cout << "Could not open input codec " << av_err2str(error)
<< std::endl;
return error;
}
|
打开视频输出
创建输出上下文
下面是创建了一个aac文件的输出上下文
1
2
3
4
5
6
7
8
9
10
11
12
13
| const char* filename = "/Users/gaozhenyu/Desktop/video.h264";
AVOutputFormat* oformat = av_guess_format(nullptr, filename, nullptr);
if ((error = avformat_alloc_output_context2(&fmt_ctx_out_, oformat, nullptr,
filename)) < 0) {
std::cout << "Could not allocate output format context" << std::endl;
return error;
}
if ((error = avio_open(&(fmt_ctx_out_->pb), filename, AVIO_FLAG_WRITE)) < 0) {
std::cout << "Could not open output file" << av_err2str(error) << std::endl;
return error;
}
|
创建指定编码器上下文
使用libx264编码器来进行编码,并设置音频编码的相关参数
1
2
3
4
5
6
7
8
9
10
11
12
13
14
15
16
17
18
19
20
21
22
23
24
25
26
27
28
29
30
31
32
33
34
35
36
|
codec = avcodec_find_encoder_by_name("libx264");
if (!codec) {
std::cout << "Could not find libfdk_aac encoder" << std::endl;
return AVERROR_EXIT;
}
codec_ctx_out_ = avcodec_alloc_context3(codec);
if (!stream_out_) {
std::cout << "Could not allocate output codec context" << std::endl;
return AVERROR(ENOMEM);
}
codec_ctx_out_->profile = FF_PROFILE_H264_HIGH;
codec_ctx_out_->level = 50;
codec_ctx_out_->width = 640;
codec_ctx_out_->height = 520;
codec_ctx_out_->gop_size = 300;
codec_ctx_out_->keyint_min = 30;
codec_ctx_out_->max_b_frames = 3;
codec_ctx_out_->has_b_frames = 1;
codec_ctx_out_->refs = 3;
codec_ctx_out_->pix_fmt = AV_PIX_FMT_YUV420P;
codec_ctx_out_->bit_rate = 6000000;
codec_ctx_out_->time_base = AVRational{1, 25};
codec_ctx_out_->framerate = AVRational{25, 1};
if ((error = avcodec_open2(codec_ctx_out_, codec, nullptr)) < 0) {
std::cout << "Could not open output codec " << av_err2str(error)
<< std::endl;
return error;
}
|
创建输出流
这里我们需要输出的轨道只有一个视频轨道,所以创建一个流就可以。创建完流后还需要将上面设置的视频编码相关参数设置给流。
1
2
3
4
5
6
7
8
9
10
|
stream_out_ = avformat_new_stream(fmt_ctx_out_, codec);
if ((error = avcodec_parameters_from_context(stream_out_->codecpar,
codec_ctx_out_)) < 0) {
std::cout << "Could not initialize output stream parameters "
<< av_err2str(error) << std::endl;
return error;
}
|
初始化图像处理上下文
图像处理上下文
FFmpeg将对视频的图像处理操作抽象到SwsContext中,根据输入的视频帧数据格式和处理后的视频帧数据格式来创建一个SwsContext。
实际上决定视频帧数据格式的就是三要素:宽、高、像素格式
1
2
3
4
5
6
7
8
9
10
|
sws_ctx_ = sws_getContext(codec_ctx_in_->width, codec_ctx_in_->height,
codec_ctx_in_->pix_fmt, codec_ctx_out_->width,
codec_ctx_out_->height, codec_ctx_out_->pix_fmt,
SWS_BILINEAR, nullptr, nullptr, nullptr);
if (!sws_ctx_) {
std::cout << "Could not allocate sws context" << std::endl;
return AVERROR_EXIT;
}
return 0;
|
录制
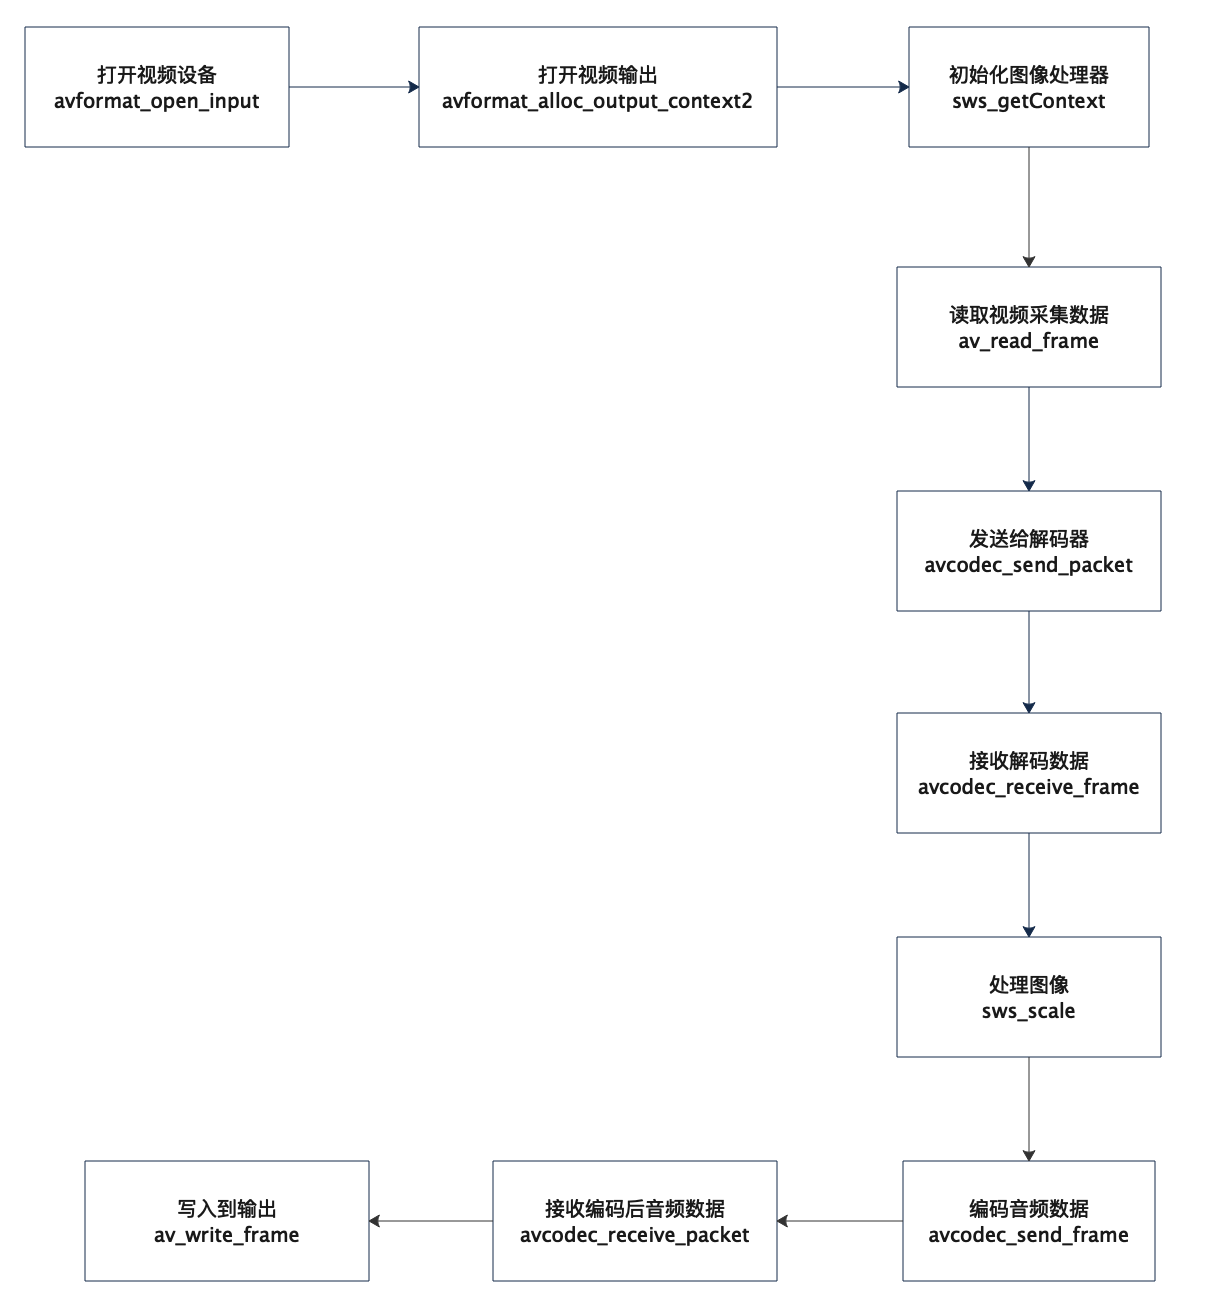
对于AVFormatContext来进行视频数据的输出,需要调用三个write函数,avformat_write_header、av_write_frame、av_write_trailer。
整体流程就是不断的从视频设备中读取数据,解码后进行图像处理,将处理后的视频帧进行编码,编码后写入到输出文件中。
1
2
3
4
5
6
7
8
9
10
11
12
13
14
15
16
17
18
19
20
21
22
23
24
25
26
27
28
29
30
31
32
33
34
|
while (request_abort_) {
AVFrame* frame = av_frame_alloc();
int data_present;
AVFrame* out = av_frame_alloc();
if ((error = DecodeVideoFrame(frame, &data_present)) < 0) {
av_frame_free(&frame);
std::cout << "Could not decoding video packet " << av_err2str(error)
<< std::endl;
goto cleanup;
}
if (data_present) {
out->format = codec_ctx_out_->pix_fmt;
out->width = codec_ctx_out_->width;
out->height = codec_ctx_out_->height;
if ((error = av_frame_get_buffer(out, 0)) < 0) {
std::cout << "Could not alloc av image" << av_err2str(error)
<< std::endl;
goto cleanup;
}
sws_scale(sws_ctx_, (const uint8_t* const*)frame->data, frame->linesize,
0, frame->height, out->data, out->linesize);
}
if ((error = EncodeVideoFrame(out, data_present)) < 0) {
av_frame_free(&frame);
std::cout << "Could not encodeing video frame " << av_err2str(error)
<< std::endl;
goto cleanup;
}
|
读取数据并解码
读取数据非常简单,创建一个AVPacket对象,通过av_read_frame就可以读取一帧数据
1
2
3
4
|
av_init_packet(&pkt);
av_read_frame(fmt_ctx_in_, &pkt);
|
通过avcodec_send_packet、avcodec_receive_frame来进行解码,avcodec_send_packet负责将一个AVPacket送给解码器,avcodec_receive_frame负责从解码器中取出一个已经解码好的AVFrame,如果返回AVERROR(EAGAIN)表明当前没有已经解码好的数据,返回AVERROR_EOF表明已经全部解码完成,返回大于0则表明获取解码数据成功。
1
2
3
4
5
6
7
8
9
10
11
12
13
14
15
16
17
18
19
20
21
22
|
if ((error = avcodec_send_packet(codec_ctx_in_, &pkt)) < 0) {
goto cleanup;
}
error = avcodec_receive_frame(codec_ctx_in_, frame);
if (error == AVERROR(EAGAIN)) {
error = 0;
goto cleanup;
} else if (error == AVERROR_EOF) {
error = 0;
*finished = 1;
} else if (error < 0) {
goto cleanup;
} else {
*data_present = 1;
error = 0;
}
|
图像处理
创建一个AVFrame用来接收处理后的视频帧
1
2
3
4
5
6
7
8
9
10
11
12
13
14
| AVFrame* out = av_frame_alloc();
out->format = codec_ctx_out_->pix_fmt;
out->width = codec_ctx_out_->width;
out->height = codec_ctx_out_->height;
if ((error = av_frame_get_buffer(out, 0)) < 0) {
std::cout << "Could not alloc av image" << av_err2str(error)
<< std::endl;
goto cleanup;
}
sws_scale(sws_ctx_, (const uint8_t* const*)frame->data, frame->linesize,
0, frame->height, out->data, out->linesize);
|
编码数据并输出
通过avcodec_send_frame、avcodec_receive_packet来进行编码。avcodec_send_frame负责将一个AVFrame帧发送给编码器,avcodec_receive_packet负责从编码器中取出一帧已经编码好的数据。
1
2
3
4
5
6
7
8
9
10
11
12
13
14
15
16
17
18
19
20
21
22
23
24
25
26
27
28
29
30
31
32
| AVPacket pkt;
av_init_packet(&pkt);
if (frame) {
frame->pts = pts;
pts += frame->nb_samples;
}
if ((error = avcodec_send_frame(codec_ctx_out_, frame)) < 0) {
goto cleanup;
}
error = avcodec_receive_packet(codec_ctx_out_, &pkt);
if (error == AVERROR(EAGAIN)) {
error = 0;
goto cleanup;
} else if (error == AVERROR_EOF) {
error = 0;
goto cleanup;
} else if (error < 0) {
goto cleanup;
} else {
error = 0;
*data_written = 1;
}
|
写入到输出
1
2
3
4
5
|
if (*data_written && (error = av_write_frame(fmt_ctx_out_, &pkt)) < 0) {
goto cleanup;
}
|